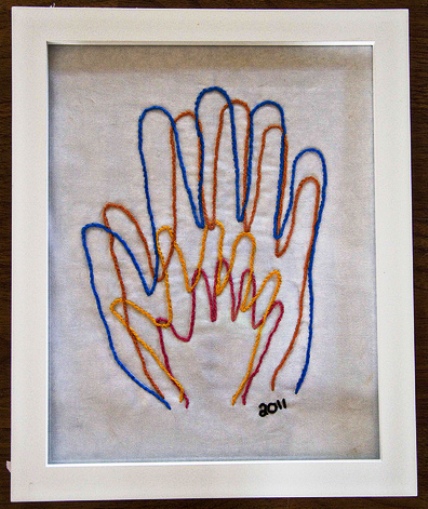
Prepare to embark on a heartwarming journey of creativity and sentimentality with a truly special craft idea – the Handprint Embroidery Keepsake! Picture a unique “family portrait” delicately crafted with superimposed outlines of the hands of Dad, Mom, and the little ones, all stitched with care using the split stitch technique. This captivating and charming piece of art is the brainchild of detroit mummy, an artistic soul who understands the value of preserving cherished memories through the art of embroidery.
Capturing the essence of togetherness and the beauty of family, this handprint embroidery keepsake goes beyond traditional photographs and embraces the timeless artistry of needle and thread. Each handprint, meticulously stitched with love, represents a symbol of unity, love, and connection. It serves as a tangible reminder of the unique bond that exists within your family, a visual representation of the cherished moments and shared experiences that make your family truly one-of-a-kind.
You’ll find yourself immersed in a meditative process that combines artistic expression with nostalgia. The split stitch, with its graceful and continuous lines, adds depth and texture to each handprint, making them come alive on the fabric canvas. The choice of colors and threads allows you to infuse your embroidery keepsake with your family’s personality and style, creating a truly personalized work of art.
Not only does this handprint embroidery keepsake celebrate the love within your family, but it also becomes a cherished heirloom that can be passed down through generations. It serves as a testament to the beauty of familial bonds and the enduring nature of memories etched in stitches.
So, gather your family members, select your fabrics and threads, and embark on this heartwarming embroidery project that will forever capture the essence of your unique family unit. Let Detroit mummy’s inspired creation be your guide as you pour love and creativity into every stitch, creating a timeless keepsake that will warm your hearts and bring smiles to your faces for years to come.
This charming piece is the work of DetroitMommy.
If you’re a beginner looking to delve into the world of embroidery, one stitch that is perfect to start with is the split stitch. This versatile stitch is not only easy to learn but also offers endless possibilities for adding texture and dimension to your embroidery projects. In this article, we will guide you through the process of split stitch embroidery, step by step.
Materials you’ll need:
Fabric (such as cotton or linen)
Embroidery hoop
Embroidery floss (choose colors of your preference)
Embroidery needle
Scissors
Transfer method (such as a transfer pen or pencil, water-soluble pen, or tracing paper)
Step 1: Prepare your fabric and hoop
Start by selecting the fabric for your embroidery project. Cotton or linen are great choices for beginners. Secure your fabric tightly in an embroidery hoop to ensure a smooth and even surface for stitching.
Step 2: Choose your design and transfer it
Decide on the design you want to embroider. You can find patterns online, create your own, or use pre-printed patterns. Transfer the design onto your fabric using a transfer pen or pencil, water-soluble pen, or tracing paper. Follow the instructions of your chosen transfer method.
Step 3: Thread your needle
Separate one strand of embroidery floss from your chosen color. Thread it through the eye of the embroidery needle and tie a knot at the end.
Step 4: Start stitching
Bring your needle up from the back of the fabric at the starting point of your design. Make sure the knot is on the backside of the fabric. Leave a small tail of thread on the back for securing later.
Step 5: Create the first stitch
To create your first split stitch, bring your needle back down into the fabric, a short distance away from the starting point. The length of this stitch will determine the size of your stitches. For beginners, starting with smaller stitches is recommended.
Step 6: Split the previous stitch
Now, bring your needle back up through the middle of the previous stitch, splitting it in half. Make sure the needle goes under the thread, creating a split effect. Gently pull the thread to tighten the stitch.
Step 7: Continue stitching
Repeat steps 5 and 6, creating a line of split stitches. Make sure each stitch splits the previous stitch in half. Maintain a consistent length and spacing between your stitches for a neat appearance.
Step 8: Secure your stitches
When you’ve completed your split stitch line or reached the end of a section, bring your needle to the back of the fabric and weave it through a few stitches on the backside to secure it. Trim any excess thread.
Step 9: Explore variations and practice
Once you’ve mastered the basic split stitch, feel free to experiment with different thread colors, stitch lengths, and patterns. As you practice, you’ll develop more control and confidence in your stitching.
Embroidery is a craft that rewards patience and practice, so don’t be discouraged if your stitches don’t look perfect right away. With time and dedication, you’ll see improvement and discover your own unique style.
So, grab your materials, set up your hoop, and embark on your split stitch embroidery journey. Enjoy the therapeutic rhythm of stitching as you bring your designs to life. Let your creativity flow and explore the endless possibilities of this beautiful stitch. Happy embroidering!



OH, I just LOVE this idea – what a precious way to capture the family…………if I were younger and my children still at home, I would DEFINITELY make this and I would add a heart in the center of the palms…………..Thank you for sharing this – it’s very inspirational!
Grandmother Carolyn
I love your idea great way to remember kids ages by their size of the hands. Thank you.
Oh wow! Thank you SO much for showing my piece! I’m flattered to get attention for this. I’m just starting out with embroidery so this is just so flattering to be shown here and Feeling Stitchy.