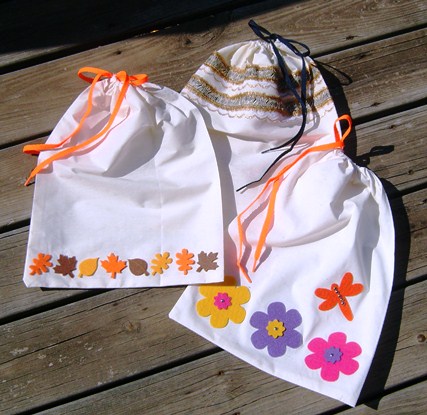
 State Line Bag Co. sent samples of their muslin bags to several CraftGossip editors, inviting us to embellish them. Mine are a generous 12″ x 16″. My first thought, of course, was to smother my bags in embroidery. Then I thought about the situations in which I’d most likely use bags such as these: goodie bags for a preteen slumber party or maybe a craft project for a scout troop. In one case, I’d need to be able to decorate a lot of bags quickly and easily. In the other, I’d need an embellishment strategy that was inexpensive, safe, and easy for little hands. So here’s what I came up with.
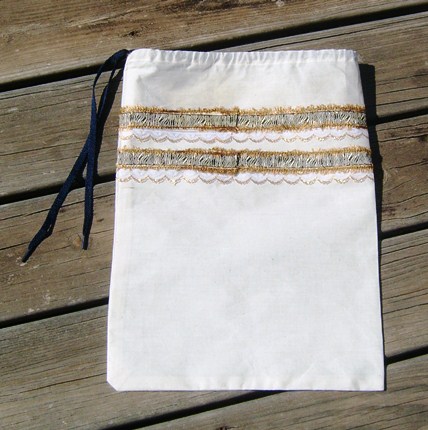
I glammed up the first bag by attaching rows of metallic lace and foofy ribbon. Just draw lines where your embellishments need to be placed, stick a line of 1/4″ fusible web (such as Steam-a-Seam) to each drawn line, stick lace or ribbon to the fusible web, cover with baker’s parchment, and iron. This view of the bag shows how I finished the edges of the ribbon. I just tucked the end back under the ribbon, tore off a bitty piece of web, stuck it under the fold, and ironed. This bag took about 15 minutes from start to finish. You can make it even more quickly if you don’t fuss around with hiding those raw edges.
I fancied up the second bag with a girls’ group in mind. The flowers and dragonfly are self-adhesive die-cut felt stickers — plentiful and cheap at any craft store. I blinged them up a little with my Bedazzler and some studs. I think they’d be even more awesome with some colorful rhinestones; I just didn’t happen to have any on hand. If my daughters are typical, then blinging up the stickers should keep your girls’ group occupied for quite some time. (Or you can turn out a finished bag in about 10 minutes.)

I had wee ones in mind when I decorated the third bag. A Cub Scout or Brownie — or even younger kids — would have no problem peeling and sticking a border (or design of their own invention) of die-cut felt leaves. You could make this version in about 5 minutes.

The muslin bags come with an unbleached cotton drawstring. I substituted bright shoestrings for fun. My time estimates include working the shoestring through the casing; so if you leave the original drawstring in place, these embellishments can be finished in a snap!
These large bags are the right size to hold a stash of toys and games, so I’m donating them to The Jennifer Project for Arkansas Children’s Hospital. The bags come in a variety of sizes. Watch the other CraftGossip blogs for ideas for using the smaller bags. For example, our sewing editor, Anne Weaver, posted an awesome tutorial using a 5″ x 7″ bag.
Would you like to get your hands on some of these bags? Check out State Line Bag Co. And keep an eye on CraftGossip! We’ll be giving away 100 6″ x 8″ bags soon!



Very cute! They sent me some too…just received them the other day and am now thinking up some designs! 🙂
Cutie patootie! I would have first thought embroidery too!
I love what you did with them Denise! Great ideas. I knew you would have to stitch or resemble it on at least one of the bags!lol
These bags turned out FANTASTIC!!!
i love these bags!!!
loved all your ideas for them. very cute!