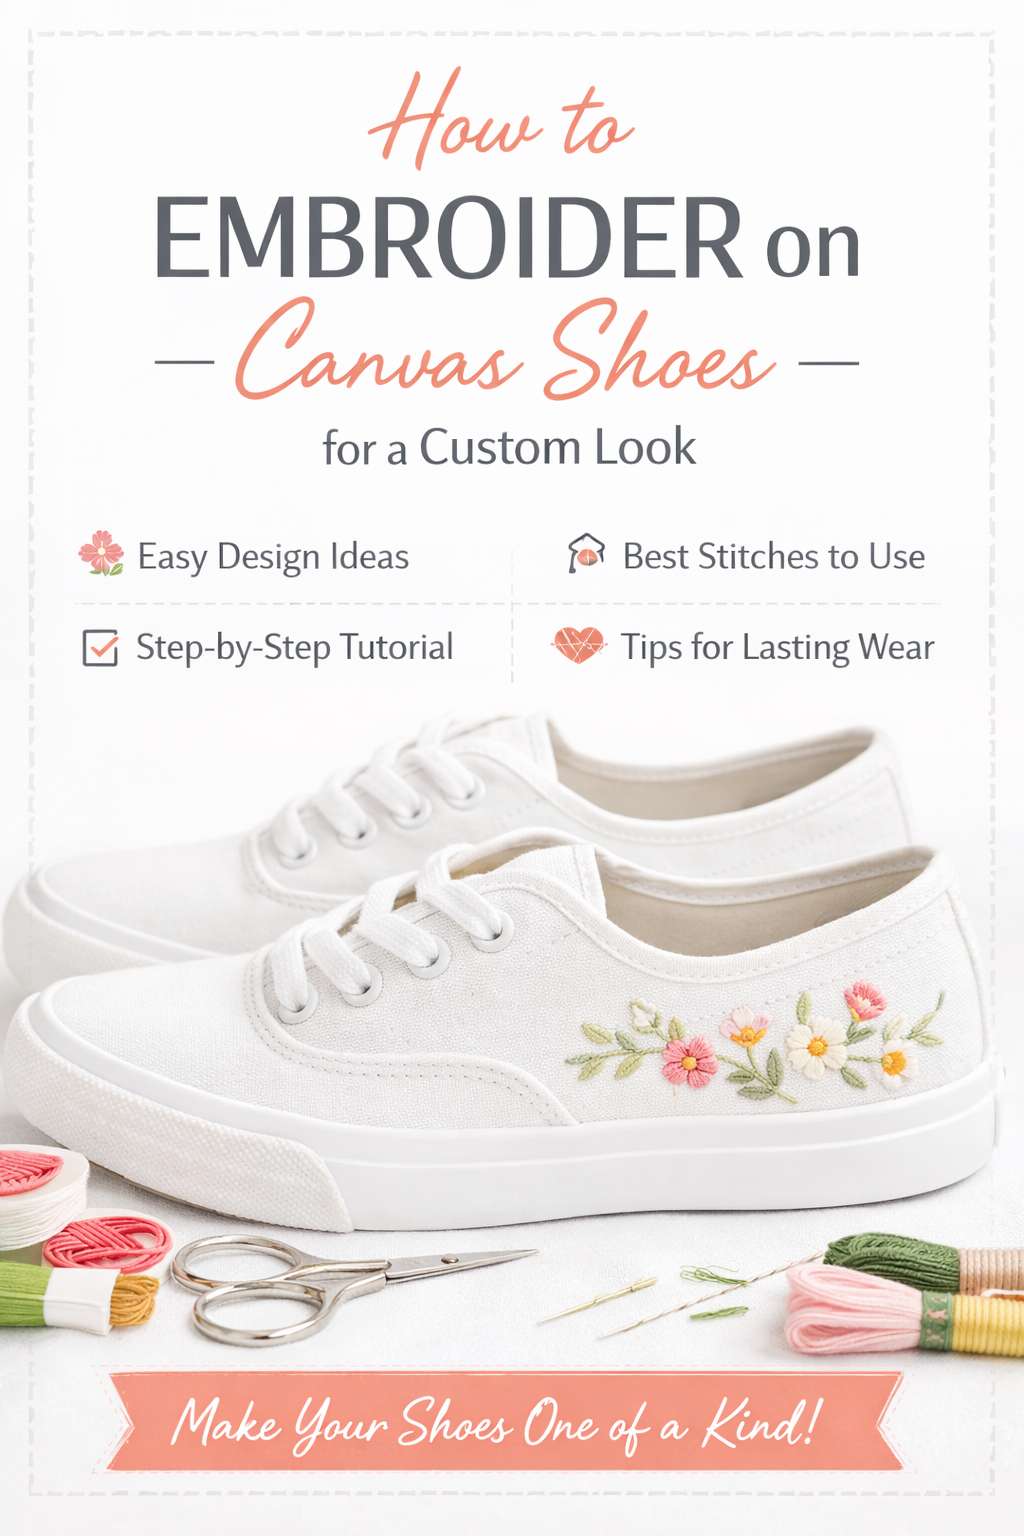
There is something very satisfying about taking a plain, slightly boring pair of canvas shoes and turning them into something that actually looks like you. Not shop-bought. Not mass-produced. Not the exact same pair everyone else grabbed in a panic because they needed “comfortable casual shoes.” I mean properly personal.
Embroidering on canvas shoes is one of those projects that looks much fancier than it really is. That is always my favourite kind of craft, because I enjoy a good shortcut to “Oh wow, you made those?” without needing to spend six months learning a rare medieval stitching technique first.
The nice thing about this project is that canvas is sturdy enough to handle hand embroidery, but still soft enough to stitch through with the right needle and a little patience. You do not need to be an expert embroiderer either. A few simple flowers, little leaves, scattered stars, initials, strawberries, hearts, bees, bows, or even a small trailing vine can completely change the look of a plain pair of shoes.
This is also a brilliant stash-busting project. If you have random bits of embroidery floss, leftover transfer designs, or a half-finished idea you never turned into a hoop, canvas shoes are a lovely place to use them. And unlike some embroidery projects that end up tucked in a drawer “for later,” these ones actually get worn.
Why canvas shoes work so well for embroidery
Canvas shoes are one of the easiest wearable items to embroider because the fabric is firm and forgiving. You are not battling slippery stretch fabric, wonky knits, or delicate silk that suddenly decides to wrinkle just because you looked at it wrong.
A plain canvas sneaker gives you:
- a stable surface for stitching
- enough structure to hold simple embroidery well
- a practical project you can actually use
- a fun way to create custom shoes without fabric paint or fancy tools
They are especially good for beginners who want to try embroidery on clothing or accessories before jumping into jackets, jeans, or bags.
Best types of designs for embroidered canvas shoes
Before you start stitching, it helps to think small. Shoes are not giant blank canvases, even though the name tries to convince us otherwise. Tiny and tidy designs usually work better than large complicated patterns.
Some of the best embroidery ideas for canvas shoes include:
- tiny floral sprays
- daisies and wildflowers
- vines along the shoe edge
- little stars or moons
- hearts
- mushrooms
- bees or ladybugs
- initials or monograms
- scattered dots and simple geometric motifs
- small folk-style motifs
If you are just starting out, choose a design with a few repeated shapes. A row of lazy daisy flowers or simple leaves is much easier than attempting a full detailed bird with seven thread shades and emotional baggage.
What you need to embroider on canvas shoes
You do not need a huge shopping list for this one, which is always nice.
Supplies
- plain canvas shoes
- embroidery floss
- embroidery needle or sharp crewel needle
- water-soluble pen or pencil for marking
- small scissors
- embroidery hoop if it fits the area, though many shoe sections are easier to stitch without one
- thimble, if you need a bit more pushing power
- optional stabilizer for extra support
- optional needle puller if the fabric is very firm
White or light-coloured canvas shoes are easiest to mark and customise, but black or coloured shoes can look amazing too. You just need a marking method that shows up clearly.
How to prepare canvas shoes for embroidery
This part is worth doing properly because it makes the stitching so much easier later.
1. Start with clean shoes
If the shoes are brand new, great. If they are already worn, wipe them down and make sure the canvas is clean and dry before stitching. Dirt and dust are not ideal crafting companions.
2. Remove the laces
Take the laces out completely. It sounds obvious, but you would be surprised how many projects become instantly more annoying because we convince ourselves we can “just work around them.”
3. Decide where the design will go
Look at the shoe shape and pick your stitching area carefully. Popular spots include:
- the outer side panels
- near the toe edge
- around the heel
- along the lace section
- mirrored motifs on each shoe
Try to avoid very high-friction fold points if you want your embroidery to last longer.
4. Put something inside the shoe
Stuff the shoe with a small towel, tissue paper, or fabric scraps. This helps support the area while you stitch and stops the needle from diving through both sides of the shoe at once, which is not the kind of accidental matching design most people are aiming for.
How to transfer your embroidery design
There are a few easy ways to get your design onto canvas shoes.
Draw it directly
If the design is simple, draw it lightly with a water-soluble pen or pencil. This works well for little flowers, leaves, stars, or initials.
Use a transfer method
You can also trace a design onto the shoe using transfer paper or a washable transfer pen. Keep the design fairly simple, especially if the shoe has seams or curved areas.
Freehand as you go
For tiny scattered motifs, some crafters prefer to place each stitch without fully drawing the design first. That works nicely for tiny stars, dots, French knots, and very loose floral shapes.
Best stitches for canvas shoe embroidery
You do not need a huge stitch vocabulary for this project. A few basic stitches go a long way.
Backstitch
Perfect for outlines, names, stems, and simple line designs.
Satin stitch
Good for filling small shapes like hearts, petals, or tiny mushrooms.
Lazy daisy stitch
Ideal for flowers and leaves. This is probably one of the easiest ways to make shoes look sweet very quickly.
French knots
Lovely for flower centres, berries, tiny accents, and dotted detail.
Stem stitch
Great for curved vines and delicate outlines.
Straight stitch
Simple but effective for stars, sunbursts, grass details, or tiny floral sprays.
If you are new to hand embroidery, stick with two or three stitches max for your first pair. There is no medal for making your shoes unnecessarily complicated.
Step-by-step: how to embroider on canvas shoes
Step 1: Plan your design
Choose a small design and decide whether you want both shoes to match exactly or coordinate loosely. Matching is neat, but slightly different designs can feel more handmade and charming.
Step 2: Mark the design
Draw or transfer your pattern onto the canvas. Keep your lines light and avoid overcrowding the space.
Step 3: Thread your needle
Use shorter lengths of floss rather than very long strands. Long strands are more likely to tangle, twist, and behave like they have developed a personal grudge.
For most shoe embroidery, two or three strands of floss work well.
Step 4: Start stitching
Begin with outlines or stems first, then add petals, leaves, and little details. Work slowly and keep your stitches fairly small and even.
Canvas can be tougher than regular embroidery fabric, so do not be surprised if you need a bit more pressure to pull the needle through.
Step 5: Check the inside regularly
Turn the shoe and look inside every so often. You want to keep the back of the stitching reasonably neat so it does not create uncomfortable lumps when the shoes are worn.
It does not need to be perfect. We are making custom handmade shoes, not preparing the back for a museum inspection.
Step 6: Secure your threads well
Since shoes get movement and wear, secure the thread ends carefully. Small knots and woven-in ends will help the stitching stay put.
Step 7: Remove any markings
Once the stitching is finished, gently remove visible transfer marks according to the pen or marking tool instructions.
Tips for making embroidered shoes look neat
A few little tricks make a big difference with this project.
Keep the design small
Tiny motifs usually look more polished than large crowded ones.
Leave space around the design
Canvas shoes look best when the embroidery feels intentional, not like every spare inch got panic-filled at midnight.
Use a limited colour palette
Two to five colours is usually enough. Too many colours can make the shoes look busy.
Avoid very thick stitching
Heavy layering can make the shoes stiff or uncomfortable.
Mirror loosely instead of perfectly
If matching both shoes exactly feels stressful, create a balanced look instead. For example, put a flower cluster on each shoe but let the shapes vary slightly.
Test the needle first
Some canvas shoes are stiffer than others. Test a small hidden spot first so you know how easily the needle passes through.
Simple design ideas for custom embroidered shoes
If you are staring at your shoes and your mind has gone completely blank, here are a few easy ideas.
Floral corner cluster
Add three small flowers with a few leaves near the outer side of each shoe.
Tiny scattered daisies
Dot small lazy daisy flowers across the toe or side panels.
Initials with vines
Stitch a monogram on each shoe with a little leafy flourish.
Bees and wildflowers
A cute option for spring shoes or garden lovers.
Celestial shoes
Add stars, moons, and tiny dots in white, gold, or pale blue thread.
Strawberry or cherry motifs
Playful and cheerful without being too fiddly.
Folk-style border
Use repeated leaves, dots, and little flowers along the shoe opening.
How to make embroidered canvas shoes more durable
Because shoes get more wear than a hoop hanging on the wall, durability matters.
To help your embroidered shoes last:
- keep stitches tight but not puckered
- secure all thread ends properly
- avoid very raised stitches in high-rub areas
- do not overfill the design with bulky layers
- wear them for lighter everyday use rather than muddy adventures
- spot clean instead of machine washing if possible
If you are worried about the embroidery shifting over time, you can add a little backing or stabilizing on the inside, but keep comfort in mind. Anything too stiff or scratchy is going to be noticed by your feet very quickly.
Can you wash embroidered canvas shoes?
Gently, yes, but with care.
Hand-cleaning is usually the best option. Use a soft cloth or gentle brush and avoid soaking them for long periods. Machine washing can be rough on embroidery, especially if you have used delicate stitches or layered details.
If your shoes are a special pair you have spent hours stitching, I would definitely treat them more like embellished accessories than everyday sports shoes.
Are embroidered shoes good for beginners?
Yes, especially if you keep the design simple.
This is a great beginner embroidery project because:
- the project is small
- you only need a handful of stitches
- the result feels useful and wearable
- plain shoes are easy to personalise
- mistakes are not usually obvious from a normal viewing distance
And honestly, wearable projects are often more exciting than practice samplers. There is something very motivating about making a thing you can put on immediately.
Styling ideas for handmade embroidered shoes
One of the nicest parts of this project is how easy these shoes are to wear. A plain pair with delicate embroidery works beautifully with:
- jeans and a white shirt
- linen dresses
- casual skirts
- denim jackets
- simple summer outfits
- crafty weekend market outfits
- relaxed travel clothes
They also make a lovely handmade gift if you know someone’s size and style well enough. Though gifting shoes can be risky business. Some people are fussy about fit, and fair enough too.
A few common mistakes to avoid
Choosing a design that is too detailed
Small areas need simple shapes.
Using too many thread colours
A cleaner palette often looks more stylish.
Stitching through both sides of the shoe
Always check inside as you go.
Making the stitching too bulky
Shoes still need to feel wearable.
Ignoring seam placement
Designs can distort if they cross awkward shoe seams.
Using very long thread lengths
That is the fastest route to tangles and muttering.
Why this is such a satisfying needlework project
There is a lovely middle ground with embroidered canvas shoes. They are practical, but still creative. Pretty, but not precious. Handmade, but still useful. And in a world full of quick craft projects that end up sitting in a pile waiting for “the right place,” it is quite nice to make something that actually leaves the house with you.
If you have been wanting to try wearable embroidery without diving straight into a full denim jacket back panel, this is a wonderful place to start. A few simple stitches, a plain pair of shoes, and suddenly you have something personal, cheerful, and genuinely one of a kind.
And really, if your fabric stash can turn into embroidered shoes, that sounds like a very solid excuse to keep the thread collection exactly where it is.


Leave a Reply