If your machine embroidery ever looks perfect in the hoop but slightly… off once it’s finished, washed, or worn, you’re not alone. This is one of the most common frustrations with machine embroidery, and it hits beginners and experienced stitchers alike.
The truth is simple but often overlooked:
Most embroidery problems aren’t caused by the machine, the design, or the thread. They’re caused by incorrect stabilising.
Once you understand stabiliser properly—really understand it—your embroidery improves immediately.
Why Stabiliser Matters More Than Almost Anything Else
Machine embroidery is controlled force. Thousands of stitches punch repeatedly into fabric, pulling it in every direction. Fabric alone isn’t strong enough to handle that stress.
Stabiliser:
• Supports the fabric
• Controls movement
• Absorbs stitch tension
• Prevents distortion over time
Without it, even the most beautiful design will struggle.
The Biggest Stabiliser Myth (And Why It Causes So Many Problems)
The most common advice floating around is:
“Choose stabiliser based on fabric type.”
That advice isn’t wrong—but it’s incomplete.
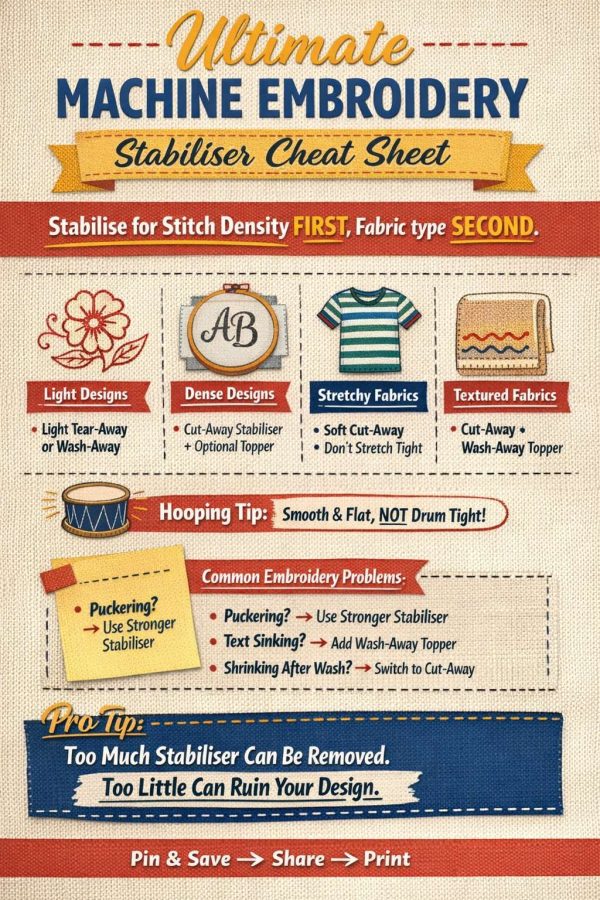
The real rule is this: stabilise for stitch density first, fabric second.
A light design on knit behaves very differently to a dense satin stitch design on the same fabric. If you stabilise only for fabric, you’ll almost always under-support dense designs.
Understanding Stitch Density (The Missing Piece)
Stitch density refers to:
• How many stitches are packed into an area
• How often the needle penetrates the same space
• How much pull the design creates
Dense designs include:
• Satin stitch lettering
• Filled shapes
• Logos
• Monograms
• Appliqué with heavy borders
These designs shrink inward as they stitch. If the stabiliser can’t resist that pull, puckering is inevitable.
Choosing the Right Stabiliser (With Real-World Examples)
Tear-Away Stabiliser: When It Works (And When It Doesn’t)
Best for:
• Lightweight designs
• Redwork or line embroidery
• Decorative stitching
• Projects that won’t be heavily washed
Tear-away stabiliser is convenient, but it provides temporary support only. Once it’s removed, the fabric is on its own.
If you’ve ever had embroidery look great at first and then warp after washing, tear-away is often the culprit.
Cut-Away Stabiliser: The Unsung Hero
Best for:
• Dense embroidery
• Clothing
• Quilts
• Baby items
• Anything that will be washed repeatedly
Cut-away stabiliser stays with the fabric permanently, supporting the stitches for the life of the project. This is why professional embroidery shops rely on it so heavily.
If in doubt, use cut-away.
Wash-Away Stabiliser: Useful but Often Misused
Best for:
• Lace designs
• Free-standing embroidery
• Light decorative stitching
• Projects where no backing should remain
Wash-away is not a substitute for cut-away in dense designs. It dissolves completely, which means all support disappears after washing.
Toppers: The Secret to Crisp, Professional Results
Wash-away topper sits on top of the fabric and prevents stitches from sinking in.
Use topper when stitching:
• Towels
• Fleece
• Minky
• Corduroy
• Text or satin stitches
Even smooth cotton benefits from topper when stitching lettering. It makes outlines sharper and lettering more readable.
Hooping: Why “Drum Tight” Is Actually a Problem
This is where a lot of well-meaning advice goes wrong.
Fabric should be:
• Smooth
• Flat
• Supported
But it should not be stretched.
When stretched fabric relaxes after stitching—or after washing—your stitches have nowhere to go. That’s when ripples appear.
Let the stabiliser do the work. The fabric should sit naturally.
Floating Fabric (A Technique Worth Learning)
Floating means hooping the stabiliser only, then attaching the fabric on top.
This is ideal for:
• Towels
• Delicate fabrics
• Pre-sewn garments
• Items too small or awkward to hoop
Use temporary spray adhesive or a light basting stitch to hold fabric in place.
Floating prevents hoop burn and distortion while still giving full stabiliser support.
How Many Layers of Stabiliser Do You Need?
There’s no magic number, but here’s a reliable guideline:
- Light designs: 1 layer
• Medium density: 1–2 layers
• Heavy density or large designs: 2 layers or cut-away + topper
If you can feel the fabric flexing while the machine stitches, it’s under-supported.
The Wash Test (The Step That Separates “Okay” From “Professional”)
If a project is:
• A gift
• A keepsake
• Something you’re selling
Always test it.
Stitch a sample.
Wash it.
Dry it.
Check it.
If the design puckers or distorts after washing, it needed more stabiliser.
This step alone will save you disappointment later.
Common Embroidery Problems (And the Real Fix)
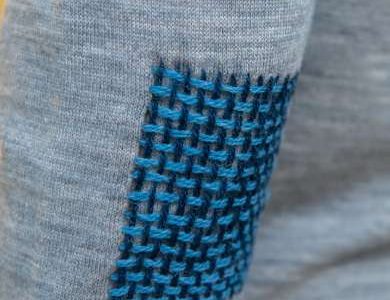
Puckering around stitches
? Stronger stabiliser or additional layer
Design shrinking or warping
? Switch from tear-away to cut-away
Text sinking into fabric
? Add wash-away topper
Fabric rippling after washing
? Stabiliser was removed too soon or wasn’t strong enough
One Last Tip From Years at the Machine
If you’re unsure which stabiliser to use:
Choose the stronger option.
Too much stabiliser can be trimmed or washed away.
Too little stabiliser ruins a finished piece.
I learned this the hard way—usually after gifting something I wasn’t quite happy with.
Why This Matters More Than Ever
Machine embroidery isn’t just decoration anymore. It’s:
• Personalised gifts
• Memory items
• Handmade businesses
• Heirloom pieces
Proper stabilising is what makes embroidery last—not just look good for a photo.
Once you get this right, everything else becomes easier.
Leave a Reply